What to Carry on the Hills: A Skiing and Snowboarding Guide
When it comes to alpine sports, Canada has some of the best mountains and resorts in the world. From Banff to Mont Tremblay to Whistler and all the resorts and ski hills in-between, there is likely some quality skiing near you to enjoy.
First time skier or snowboarder? You might be overwhelmed by all the gear you might need to get out on the hills. That is why we wrote this ski buying guide: to make getting on our world class mountains easy.
What to wear when skiing or snowboarding
Like many winter activities, what you wear while skiing and snowboarding can really make or break your experience. Higher elevation means cooler temperatures and whipping winds. If you are not dressed warm enough to be comfortable on the hill, you will not likely enjoy your skiing experience.
Not only can skiing be a colder past time, but it can be dangerous one too. While most skiing accidents can be avoided by knowing your skill level and staying in your comfort zone, we will also cover some necessary pieces of safety equipment you will need to ensure your wellbeing on the hill.
More than anything, enjoying a ski trip revolves around being prepared for whatever the mountain throws at you each day you go. Chances are, you will not need everything on this list before you go skiing – safety equipment aside. This guide combines extensive research as well as our own experiences on the hill to bring a list of each type of gear you might need for different uses, as well as some product recommendations if you do not know where to start.
What to wear: underneath
In the past, I threw on my ski jacket and snow pants without giving what went underneath too much thought. Sweatpants? A natural choice since they’re warm and non-restrictive. Doubling up on socks? Gotta keep your feet warm! However, after getting off the hill cold and damp numerous times, I realized staying warm and dry on the hill is as much about what goes underneath as much as what goes on top.
Base layer
For more thermal shirt base layers, we made this buying guide here.
Ever since I purchased my base layer earlier in the season, I have seldom left my house without it on underneath. Base thermal layers improve the warmth and comfort for any winter activity.
Thermal layers are designed with warmth, fit, and moisture wicking in mind. This is important with an activity like skiing, with periods of increased physical assertion broken up with the inactivity of sitting on the chairlift. If you are underdressed, you may be miserable going up the mountain. If you are overdressed, you may work up a sweat going downhill, only to be moist and shivering once you stop. Base layers do not accumulate moisture like other material (like cotton), and help you regulate your body temperature more effectively. Look for materials like wool or synthetic materials like rayon and polyester to ensure solid water-wicking performance and long-lasting warmth.
Note that for base layer bottoms, many swear by base layers that are ¾ length, as longer bottoms can bunch up in your ski boot or rub between the boot and your skin. However, this is not ideal if you want to wear the base layer off the hill as well.
A budget base layer
Uniqlo HeatTech
The Uniqlo Heattech thermal tops and bottoms are what I have been wearing most days this winter, and has got me through -35∘C walks to work (no exaggeration here). While not the best in terms of warmth or performance, the Uniqlo Heattech line is unparalleled in terms of value.
The Heattech line are primarily made up of thin base layers made from a stretchy, moisture-wicking synthetic blend. While the base HeatTech is thin and will not provide enough insulation by itself, the HeatTech line layers impressively well. There are also versions of the HeatTech designed to improve warmth, like the aptly named “UltraWarm” line. Even if you do not plan on skiing a lot, if you find yourself cold during Canada’s winters, then picking up an inexpensive base layer from Uniqlo might make outside a whole lot more attractive.
Mid-layer
Depending on when you plan on skiing, it might not be enough to throw on a base layer and a jacket on top. Mid layers are designed to do the bulk of the insulating, combining with shell type jackets for all around performance on the hill or with typical ski jackets for additional warmth.
The coldest days might require thick fleece or a down jacket, while warmer and wetter days might call for a lighter weight fleece or a synthetic jacket. Really, you can use any sweater, hoodie or insulated jacket for a midlayer, but we still recommend staying away from cotton.
A good fleece for the mountain
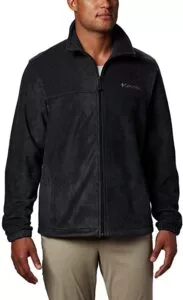
Columbia Steens Mountain 2.0 / Columbia Benton Springs Full Zip
These are comfy fleece layers from Columbia at budget friendly prices. While not being the warmest fleece layers out there, these should provide decent insulation while being breathable and comfortable. Another thing to consider is that this fleece is not as durable as expensive fleece, as the material is prone to pilling.
Fleece is a great material to keep you warm, and while these are not the warmest, once you are all layered up, you will be able to happily grace the elements, even on colder days.
Honourable mention to the Patagonia Men’s / Women’s R1® Fleece Pullover, which is a highly successful fleece pullover layer that is warm and breathable, that would’ve made this list if it was not almost entirely out of stock at the time of writing this article.
A solid lightweight puffy jacket
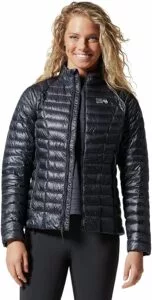
Mountain Hardwear Ghost Whisperer 2
The Mountain Hardwear Ghost Whisperer 2 is a down-insulated puffy jacket that is lightweight yet warm.
One of the lightest puffy mid layers available, the Mountain Hardwear Ghost Whisperer weighs only 8.3 oz, and packs down ridiculously small, making it great to take along for ski touring or ski vacations far away. Down is a great material for insulation, since it is so lightweight, warm, and long lasting.
However, it is not a great material for outer layers, since down is not great at insulating when wet (while synthetics can excel at insulating even if damp). The 10-denier thin shell also is not durable to withstand wear and tear, so we exclusively recommend using this jacket as a mid-layer option.
Ski socks
For a complete buying guide on our favourite ski socks, check out our article here.
Socks are another important of gear that are worth seriously thinking about. You should aim to only wear one pair of socks with your ski or snowboard boots: these boots are designed to provide some warmth and should be tight enough that you will not need extras. So instead of bundling up socks, maybe consider a nicer pair of ski socks. Improving the moisture wicking and heat retention will do wonders for your feet.
Whenever I am doing outdoor activities and the weather may get cold, I always opt for merino wool socks. They are famously warm, breathable, moisture wicking, and odor resistant.
We recommend socks from Smartwool and Darn Tough as the main brands making high quality ski socks. Across each company’s product ranges, there are consistently warm socks for your winter sport needs.
What to wear: On top
What you wear as your outer layers matter greatly in keeping you warm, dry, and comfortable on the hill, to a great degree. You can get by without buying layers for underneath, but if you do not have a jacket, pants, and gloves for skiing, you will have a bad time on all but the warmest days.
Shell or Jacket
You likely already have a coat or jacket for whatever Canada’s winter wants to throw at you. However, whether or not your jacket will have you covered in the coldest days on the hill might be a surprise.
Typically, you need two things to stay warm and dry for winter activities: insulation for warmth and a waterproof layer to keep snow and moisture off you. Many winter jackets can do both, but some may be lacking in one department or are not ideal for skiing for other reasons. Jackets designed with skiing and snowboarding in mind include a whole bunch of additional features to keep you comfortable on the hill, including powder sleeves and skirts to prevent loose snow getting inside through where garments meet, pockets designed to keep your items safe and secure, and
If you plan on accumulating different layers to wear in different conditions, you might consider getting a shell jacket instead of a typical ski jacket. Shell jackets have strong weatherproof and windbreaking features, while lacking the insulation so you can wear the right amount of insulation for however cold the day is. Hard shell jackets feels like they have a slightly crinkly feel texture to them, while soft shell jackets feature other materials that are less-waterproof and more water-resistant (here’s a great article with a more thorough breakdown).
A strong 3-in-1 jacket
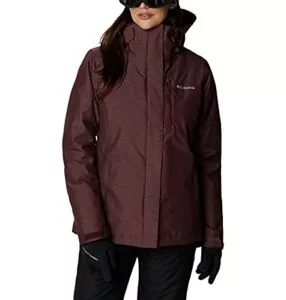
Columbia Whirlibird IV
If you are not well-versed with the terminology of winter sports, the talk of concepts like “mid-layer” and “outer shell” might seem like too much to get into. Knowing what qualities to look for in many different pieces of specialized equipment might seem overwhelming. With that in mind, this 3-in-1 jacket from Columbia is a great place for newer skiers to start.
This jacket has two components – an insulated mid-layer with a hard shell, that can be worn together, or separated if the conditions call for it. Together, you get both insulation and the hard-shell weather protection you need in a jacket. Since it’s modular, you can upgrade individual components or mix and match.
A strong shell to upgrade to
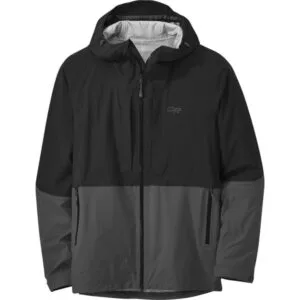
Outdoor Research Carbide Shell
If you are looking to upgrade your ski jacket for an intense winter of all sorts of skiing in all sorts of conditions, a shell like this one from Outdoor Research is a great choice. The Outdoor Research Carbide provides a strong waterproof and windproof shell that pairs well with most mid-layers, while not being ridiculously prohibitively expensive for all but the most invested ski gurus.
The Outdoor Research Carbide has no insulation, meaning it is a pure shell jacket. However, this design choice improves the breathability and ventilation greatly, making this a strong shell for use any time of year. Combine with well-thought out insulating layers, and you can handle whatever the mountains throws at you.
Ski or snowboard pants
Your legs need some warmth and water resistance too. Not only are these parts prone to getting cold and are essential to skiing and snowboarding, but any falls (or even just connecting your boots to your snowboard) will leave you feeling cold and wet. For pants, we think being more waterproof is more important than the insulation – since you can layer underneath. You also want a full range of movement in your ski pants – how else are you going to shred that fresh powder?
A budget ski pant
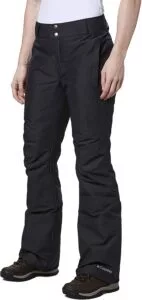
Columbia Bugaboo pant
Columbia is a name I trust for outerwear when I’m on the mountains. Their Bugaboo line of ski pants is an inexpensive, yet warm pant that is reliable for either a first time outing into the mountains, or a solid weekend skiing in decent conditions.
Made from a 100% Nylon shell and 100% Polyester lining and insulation, making them warm, water resistant and windproof. However, with no vents, this is not the most breathable pair of ski pants available.
We highly recommend referring to Columbia’s size guide before purchases, since these pants are a little on the larger side in terms of waistband and are not designed with a modern cut. However, for such an inexpensive product, this shouldn’t be a deal breaker
A great upgrade
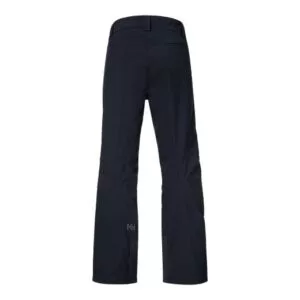
Helly Hansen Men’s Legendary Snow Pants
You can spend a lot of money on Arc’teryx or Patagonia snow pants, but even the most adventurous skier or snowboarder can get by with a strong offering for less like the Legendary Snow Pants from Helly Hansen.
These snowpants primarily feature a durable outside shell with some limited insulation, providing for a versatile pant – just throw on some base layer bottoms or some moisture wicking pants, and you can easily be warm enough in conditions -10C or colder.
Users find these pants weatherproof, breathable, and able to handle any conditions thrown at them. However, since they are more of a shell pant, it is important to consider how you will wear your bottom layers to ensure you are as warm as you need to be.
Gloves
Gloves that keep your digits warm and dexterous while whipping down a cold hill are a necessity. You need more insulation for your hands than what your everyday pair of gloves or mitt will likely provide.
You have the choice between gloves, with individual fingers, or mittens, with a pocket that keeps your fingers together and warm. It does not really matter which style you prefer: mittens will be warmer, while gloves provide more dexterity for snapping in your boots into your bindings.
There are plenty of expensive gloves or mitts for extreme conditions. You probably do not need a top of the line pair of gloves or mitts, unless you do not let extreme conditions deter you from the slopes (but, you probably should let it deter you). At the minimum, you will need gloves or mitts designed with skiing in mind.
A budget pair of ski gloves
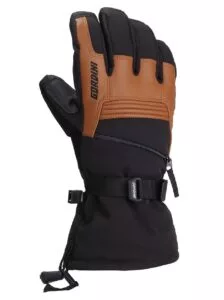
Gordini Gore-tex Storm Trooper II
The Gordini Gore-tex Storm Trooper II are excellent gloves for the price.
These gloves are warm, weatherproof, with a Gore-Tex insert that is both breathable and moisture wicking.
While not the absolute warmest gloves available, they should provide more than adequate warmth and weather protection while skiing.
However, some users find these gloves are not super dexterous.
Fasting a binding might be a little tedious, and you can forget using your phone with the gloves on (very few skiing gloves have touchscreen compatible material).
Gaiter
Gaiters are the preferred method of ensuring your neck and collar is warm. Neck gaiters slide over your head, and insulate your neck, as well as wick moisture away from your skin. Scarves will blow around and prove hazardous.
A gaiter for everyone
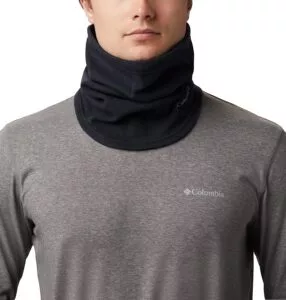
Columbia Unisex Trail Shaker Gaiter
This smooth gaiter from Columbia feels nice, and keeps your neck and face warm.
It does not have the best moisture wicking performance, but for $20 is a great choice.
One of the great things about this gaiter is that it leaves you feeling warm without weighing too much or being too puffy. In fact, people often point out how this is light and thin, which is ideal when you already have a zillion of other accessories to carry.
Like most gaiters, the Columbia Unisex Trail Shaker Gaiter is a one-size-fits-all way to keep your face warm during the coolest days.
Ear protection
There are plenty of ways of keeping your ears warm on the hill, but finding the right one for you can involve some trial and error. Some helmets might have adequate ear protection, while you might need to wear a toque or a headband with some others. Ensure that your helmet fits correctly if you do intend on wearing a toque with it, as a bulky hat may take up too much space, stopping the helmet from working as intended.
Helmets
Like many sports, safety equipment is a necessity. Skiing and snowboarding are essentially just going down a mountain really fast, so obviously things can be dangerous if you are not careful. Every rental facility at every ski hill will have helmets to rent, and there will be helmet regulations at most, if not all, ski hills you visit.
While fit and protection are obvious features that you should prioritize when looking for a helmet, ski helmets provide other features that other helmets do not – they keep in mind warmth and breathability, have hooks to ensure your goggles stay attached.
A good budget place to start
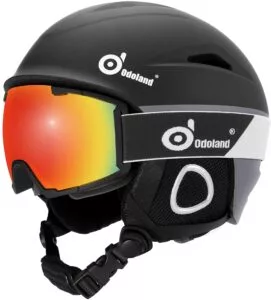
Odoland Ski Helmet
If you want to get on the hill quickly, this helmet and goggle combination from Odoland can help quickly fill out your ski gear bag.
With a shockproof and penetration resistant design, this Odoland helmet holds up in terms of protection. Combine these features with a aerodynamics-considered design, and the Odoland ski helmet becomes a strong choice for many entry level skiers and boarders.
Users really seem to enjoy the softness of the padding and straps, making wearing this helmet very comfortable. The helmet itself does its job in keeping your noggin safe, and while the goggles are prone to fogging up, they keep the glare and the wind out of your eyes. For both items at such a budget price, newer skiiers and snowboarders really can’t go wrong.
An incredible upgrade
Helly Hansen Men’s Legendary Snow Pants
You can spend a lot of money on Arc’teryx or Patagonia snow pants, but even the most adventurous skier or snowboarder can get by with a strong offering for less like the Legendary Snow Pants from Helly Hansen.
These snowpants primarily feature a durable outside shell with some limited insulation, providing for a versatile pant – just throw on some base layer bottoms or some moisture wicking pants, and you can easily be warm enough in conditions -10C or colder.
Users find these pants weatherproof, breathable, and able to handle any conditions thrown at them. However, since they are more of a shell pant, it is important to consider how you will wear your bottom layers to ensure you are as warm as you need to be.
Goggles
For a thorough buying guide covering all of our favourite goggles, check here.
Goggles are not strictly necessary like a helmet is, however once you ski with the right pair of goggles, you may never go back. Goggles protect your eyes from the conditions and improve your vision on the hill, making them an indispensable part of my skiing equipment every single outing.
Goggles do many things more than just stop snow and wind getting in your eyes. They often provide UV protection, as well as colour correction so you can see well in whatever conditions you ski in.
While we covered many different ski goggles in the buying guide above, you can trust Smith, whether you are looking for budget goggle (Smith Range) or a top of the line goggle (Smith I/O Mag).
Boots
Now we are getting into rental territory. Both ski boots and snowboard boots can be rented, just like the skis and snowboards they attach to. However, not everybody is super into the idea of putting their feet in rental boots, or you just might want to save some money for the next ski season. But regardless of whether or not you are skiing or snowboarding, the boots is essential.
We were planning to commit hours into research and going to list some ski boots worthwhile – however, we quickly found that your boots should be fitted by a professional. How well your boot fits can be a make-it or break-it, and not every boot will work for different people. As a website, we cannot do some of the essential things a bootfitter can do for you, like measure your foot or ensure that you have the right amount of room in your boot’s shell.
Your bootfitter should ask about what you like to ski, what you like and dislike, and consider your weight, age, and fitness level. A good bootfitter will also consider the length of the boot (many skiiers wear boots that are too big (they should not be 1:1 for your actual shoe size), the width, the flex of the plastic, and the cuff angle (the relative angle of the foot vs the sole of the boot).
The Ski essentials
Shopping for skis can be daunting from a first-time buyer’s perspective. There is so much terminology, so many different makes and models, and so many different pieces of equipment you may or not need that it can be dizzying if you do not know where to start.
What’s your skill level?
This can be hard to gauge but understanding what types of features are better suited for different styles or difficulties of skiing is more than half the battle.
Beginners are recommended to choose skis with a softer flex, since these skis are “more forgiving” – meaning they can be easier to control or correct mistakes on. Beginner skiers might prefer skis with a shape described as “combined camber and rocker,” which arches up in the middle yet the tip and tail also curve upwards.
Once skiers get to the “intermediate” or “expert” level, they will probably then want skis that do exactly as they want – this means more width, rocker tips to let skiers tackle the back country easier, etc. As you ski more, you also will learn what types of conditions and terrain you like to ski in, and as a result, you can fine tune your skis to your style.
If you like moguls and carve up and down the mountain, certain materials like Titanal or Carbon will absorb the vibrations and improve the stability of your ride. These skiers might also choose thinner skis (60-99mm) which make it easier to switch edges when carving. If you carve mainly on groomed runs, consider widths on the upper end of the “groomed run” skis, which is between 75mm and 84mm.
If you like to go when and where the fresh powder is, opting for thicker skis (100mm+) with either a rocker tip or full rocker camber will float above even the fluffiest snows.
Back country skiers might either be happy with the thick skis we mentioned previously, or carbon skis that are stiff yet lightweight.
Finally, if you are a jack-of-all-trades skier, look to all-mountain skis, ideally between 85-110mm widths for use in Canada’s west, but you can go slightly thinner if you are sticking to mainly out east.
Ski length
We’ve briefly touched on width when discussing what types of skiing there is, however that is only one part of the sizing equation. Your height, weight and ability will influence your decision on what length of skis you will need. A rule of thumb indicates that a ski height between your chin and top of your head when standing up. However, there are additional tips that can help you pick the right set of skis for your skill level and use. If you are returning to skiing or new to the hobby, shorter skis will help you make turns faster.
| Beginner | Intermediate | Advanced | Expert | |
| Groomed runs (on-piste) | Your height -10cm | Your height -7cm | Your height -5cm | Your height |
| All-mountain (on- and off- piste) | Your height -10cm | Your height -5cm | Your height | Your height +5cm |
| Freeride and powder (off-piste) | Your height -5cm | Your height | Your height | Your height +5cm |
Ski Shape
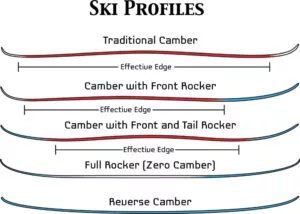
Ski length and width are not the only important aspects, and the natural shape of the ski also have an important role. Camber and rocker are two types of arches skis may have
Camber – Camber skis have an arch where the tip and the tail contact the snow, and the middle raises off the snow when unweighted. This can aid turning and have a typically softer flex than other styles.
Rocker – Rocker is the reverse of a camber – the tip and tail raise up, and the middle is the point of contact with the snow beneath. Rockers provide float for use in powder, but lose performance in harder snow, and turning can be more difficult as well.
Combined camber and rocker – This style combines the camber shape, with a tip and tail that also rise up off the ground. Difficult to visualize? Think of the shape of a pencil mustache. These skis both help floating in powder while improve maneuverability.
Sidecut
The sidecut is an inward curve along the length of the ski. The sidecut is calculated from the ski dimensions, written as three numbers, for example, those numbers might be 122 – 86 – 115. The first number is the width of the “shovel,” or the widest part of the tip, the second is the narrowest part of the ski, and the third number is the widest part of the tail of the ski. The bigger the difference between the bigger and the smallest numbers, the bigger the side cut and as a result, the shorter the turning radius. However, less of a sidecut improves performance on powder, so like everything relating to skiing, what type of sidecut you want depends on how you ski and where you ski.
Flex
Ski flex refers to the stiffness a ski responds with when turning. The more flex, the easier for turning and maneuvering. However, they are known for chatter at higher speeds. Beginners are recommended to choose skis with more flex, while more intermediate or advanced skiers might choose for more rigid skis.
The snowboard essentials
Just like skis, first time snowboarders might be overwhelmed by the range of products available and the lingo involved with snowboarding. The lingo is similar, although there are some notable differences in what to look for in snowboards.
Snowboard length
One slightly outdated method is that the snowboard length should be somewhere between your noise and chin, when stood up on its tail, although retailers nowadays make their recommendation based on weight moreso than height.
| Rider weight (in lbs) | Snowboard size (in cm) |
| 110–120 | 128–136 |
| 115–130 | 133–141 |
| 125–135 | 139–147 |
| 135–145 | 144–152 |
| 140–155 | 149–157 |
| 150–165 | 154–162 |
| 160–175 | 159–167 |
| 175+ | 160+ |
Snowboardwidth
Like many factors, width of the snowboard will impact many factors of riding – board thickness is a huge aspect that will impact how easy it is to carve or turn. However, width is highly dependent on boot size, and you will not want a board that your boots will overhang. If you are looking to get a snowboard, it is smart to get the whole package together of a board, bindings, and boots, because the synergy of the three (how well they work together) can really influence the performance of the board. The following guide can help you pick a board for your boots, or vice versa.
| Men’s boot size | 6 – 8 | 8 – 9.5 | 10 – 11.5 | 11.5+ |
| Women’s boot size | <7.5 – 9.5 | 9.5 – 110 | 11.5 – 12.5 | 13.0+ |
| Recommended snowboard waist width | 235 – 245mm | 245 – 255mm | 255 – 260mm | 260 – 265mm |
Shape
The shape of snowboards may change, based upon certain riding preferences. One of the most important aspects that influences shape that is unique to the snowboard is how they ride: either regular or goofy. These terms refer to which foot is forward on the board: left foot first downhill (regular) versus right foot first downhill (goofy). Boards that can be ridden either way are called twin boards. “True twin” boards are completely symmetrical, making them great for terrain park riding, while “directional twin” boards are good for use all over the mountain. Directional boards are usually asymmetrical have one correct direction they should be ridden on and are designed for high-speed boarding or free-riding.
Snowboard camber and rocker
Just like skis, snowboards also have an arch or shape to them also called a camber or a rocker. These terms mean the exact same thing for skis as they do boards, but for a quick refresher, here are the differences, with some unique combinations you might find when looking for boards.
Camber – Camber boards have a slight arch in the middle, and when unweighted, touches the ground on both ends only. Camber boards provide a stable yet enthralling riding experience, with a responsive feeling on hard packed or groomed runs.
Flat – some boards are either flat or almost flat, with no curvature in the board. This style enables quick turns while increasing the float of the board.
Rocker – Just like rocker skis, the tips and tails of the board are curved and do not meet the ground, instead meeting the ground in the middle. Rocker boards handle very well, making them a favourite among novice riders.
Camber / Rocker – skis also have a similar style, where the tip and tail of the board are lifted off the ground, yet the middle arches off the ground as well. The goal is to provide the edge hold of the camber with the easy turning and flotation of the rocker style.
Flat / Rocker – This style of snowboard is similar to the rocker style, but is flat underfoot. to provide a decent edge hold on hard snow and rockered tips and tails for stronger turning and good float.
Type of snowboard
Once you have snowboarded enough that you know what you enjoy, you can plan to get a board that is specialized for how and where you like to board. Different types of boards have specialized features that improve their performance in certain conditions or part of the mountain. There are about 5 different types of snowboards – all mountain, freestyle, freeride, powder, and splitboards.
All mountain – All-mountain boards are designed to handle whatever you throw at them – from greens to double black diamonds, from the terrain park to backcountry.
Freestyle – Due to their lightweight build, flexible material, and twin tips, freestyle boards are a favourite among terrain park frequenters, but can handle most places on the mountain. However, they are not ideal for going fast on hard snow due to a general lack of stability.
Freeride – If you want to do the majority of your boarding in the backcountry, a freeride board is up your alley. Freeride boards are directional, meaning they are designed for one end always facing downhill. These boards have less flex, and are stiffer than freestyle boards.
Powder board – These boards are for shredding some serious powder. With a nose designed to cut through powder and bindings located further back than other boards, these are solid choices to take into the back country.
Splitboard – Here’s something new to us: a split board can be rode as a snowboard or break into two pieces and become skis. Splitboards are designed for backcountry use, allowing you to climb backcountry slopes on the skis and reconnect them together to board downhill.
The downsides however to splitboards involve the complexity of this board and the skills and confidence to make the use of it. This board is kind of a novelty, and should only be considered if you really plan on doing some serious ski touring, but only on a snowboard.
Frequently asked questions
What is easier: skiing or snowboarding?
A debate between which snow sport is easier is a long lasting one, but it is also entirely subjective. Your prior skills, athletic aptitude, coordination and will have an impact on your natural skill when it comes to either sport.
As a lifelong skier, it would be natural for me to find skiing easier. Having tried both, skiing feels more natural, since each leg can work independently from the others – not having to do up my bindings atop every hill and not struggling on the long, flatter portions of the mountain made me stop my snowboarding experiment altogether. However, many snowboarders I have talked to found the snowboard easier to pick up. If you have experience with skateboarding, longboarding, or surfing, then the board might be more intuitive for you.
According to outdoor wear company Mountain Warehouse, “skiing is generally easy to learn initially but is harder to master. Snowboarding is harder to learn but reaching an advanced level is easier.” At the end of the day, everyone has different skills and abilities, and choosing either winter sport should be a decision you make yourself.
How to adjust ski bindings?
If you need your ski bindings quickly adjusted to fit a new boot, you can bring this into any ski store. However, for users who want to learn the ins and outs of skiing, we can get you started with learning how to adjust your ski bindings.
First, you should figure out a DIN setting that will work appropriately. DIN settings take many things into account, and you will need to consider your body weight, age, ability, length of the sole of your ski boot and release force setting. Once you know what DIN setting you want to adjust your bindings to, you can begin with the adjustments.
Place your skis on a flat surface. Open the binding by holding down the two levers and slide the toe of one boot into the front of the bindings, pressing down on the heel, and listen for the click. If this is difficult, adjust so the boot can fit. Then, use a screwdriver to tighten or loosen the toe piece to where it needs to be. When the toe piece is slightly wider than the width of the boot sole, you can then move on to adjusting the heel length.
To do this, loosen the screw at the back of the binding, and carefully move the binding by lifting it to meet the length of the boot. If the boot seems to fit securely, tighten the screw.
What size ski boots do I need?
Ski boots are important and can be the difference between a miserable day on the hill and sore feet to an exhilarating day of skiing followed by relaxing apres ski. While we recommend newer skiers go into a ski store to be professionally fitted over buying online, here are some general tips to help buying ski boots an easier process.
- If you own skis with bindings already attached, ensure that any boot you look at is compatible.
- Look for ski boots that fit your feet
- Ski boots are sized in Mondopoint, which can convert to and from both US and European shoe sizes. However, some skiiers recommend going down a size, ensuring a snugger fit that will make skiing easier. If you need ski boots for wider or narrower feet, pay attention to the “last width”. This is the width of the inside of the boot shell across the widest part of the forefoot.
- Make sure the shell fits. Ski boots have 3 main components: the outer shell, the footbed and an inner liner. However, you will need to see if the shell will work for you before going forward concerning yourself with the other components. Before checking if a shell fits, ensure you are wearing thin socks (not the thick socks you might ski in, this is counterintuitive). Leave the boot unbuckled and loose, and slip your foot in. When your toes are touching the front of the boot, flex forwards, bending at the knees, and see how much room there is at the back of the boot. If you can fit 2 fingers comfortably or more, the shell itself is too big. You ideally want 1 or 1.5 finger lengths of space between your leg and the shell of the boot.
- Liners and footbeds – Once you have determined the outer shell works for you, you can try on the boot with the liner inside. If your boot feels nice for 15 minutes, you should be set for taking it out on the hill.
How to choose ski length
Traditional wisdom suggests that your ski length be around the height of your chin or top of your head, but this is slightly archaic, as factors such as where you ski, how much you weigh, and how skillful you are also factors. Size shorter if you are newer to skiing, weigh less than average for your height, or you make short, quick turns at lower speeds. Longer skis are better for faster, more aggressive skiers and people who weight more than average for their height.
How to choose ski pole length.
First, I have not addressed ski poles much – they are not necessary, and some people detest them. However, for flatter portions of the hill, they can save you a lot of work, and they make for great tools to release your bindings without bending over. Finding ski poles, unlike skis, only require your actual height.
Ski pole size chart
| Skier height | Pole length |
| 4’5″ – 4’8″ | 100cm |
| 4’9″ – 5’0″ | 105cm |
| 5’1″ – 5’3″ | 110cm |
| 5’4″ – 5’6″ | 115cm |
| 5’7″ – 5’9″ | 120cm |
| 5’10” – 6’0″ | 125cm |
| 6’1″ – 6’3″ | 130cm |
| 6’4″ – 6’6″ | 135cm |
| 6’7″ | 140cm |
(Chart sourced from here ).
How to wax a snowboard?
Snowboard wax is not only used to improve the smoothness of your skis, but also keeps your board from drying out. Skis also benefit greatly from waxing.
To wax your snowboard, it is a good idea to first remove the bindings. Then clean the base of the board, wiping off any dirt or wax from your last application. Now, if you need to heat your wax, it is recommended you buy a waxing iron, but a clothes iron can work too (just give up thinking about ironing your clothes with the iron afterwards). Melt the wax with the iron, and drip it over the board. Afterwards, iron the wax over the board and smooth it out. Let the wax cool for half an hour and smoothly clear off any excess using a scraper tool.
What snowboard size do I need?
You can refer to the snowboard size chart, as a baseline to help you establish what would be the best size of board to start out on.
Snowboard Size Chart
| Rider height (inches) | Rider height (centimeters) | Rider weight (lbs) | Snowboard size (cm) |
| 5′ | 152 | 115 – 130 | 133 – 141 |
| 5’2″ | 158 | 125 – 135 | 139 – 147 |
| 5’4″ | 163 | 135 – 145 | 144 – 152 |
| 5’6″ | 168 | 140 – 155 | 149 – 157 |
| 5’8″ | 173 | 150 – 165 | 154 – 162 |
| 5’10” | 178 | 160 – 175 | 159 – 167 |
| 6′ | 183 | 170 – 185 | 160+ |
| 6’2″ | 188 | 180 – 195 | 160+ |
| 6’4″ | 193 | 190 – 205 | 160+ |
How to set up snowboard bindings?
Setting up snowboarding bindings is not too different from setting up ski bindings.
For many snowboards a #3 Philips will be the only tool you need. Then, you should separate your left and right bindings, and considering whether your ride goofy or regular, lay them out so you can visualize which binding is going where.
To figure out the stance width (how far apart the bindings will be) is to measure the length or your shinbone or get into the position you snowboard in and measure the distance between your feet. Also consider whether you want the bindings to be centralized on the board, giving solid all-around control, or for more experienced boarders, offset the bindings to the back of the board, for better performance in powder and when turning. Then angle the bindings so that the front binding is at 15 degrees and the other is around -5 degrees
Once you figure out how the bindings will be positioned, its time to mount the bindings on the board. It is easier to start with the binding of your forwardmost foot. Place the biding with the included disc lined up overtop the screw holes, over the screw holes where you want to place your bindings, and screw the screws in loosely, only fully tightening them when all of the screws are inserted and the binding is correctly in place. Then follow the procedure with the second binding and you should be good to go!
How should snowboard boots fit?
You want to look for boots that will have no heel lift, with your toes just touching the front of the boot, that is consistently snug. You will also want to consider things unique to you and your needs. Are your feet thick, narrow, high arched, or flat footed? Do you want a stiff boot that will last you longer, or a flexier boot that will be comfier sooner? Also consider the laces, since almost all snowboard boot companies use a different lace system.
How much is a snowboard?
In Canada, snowboards can cost anywhere from $200 dollars or less if you manage to find a good clearance deal, to upwards of $700.
How to Learn how to ski or snowboard?
The best way to learn skiing or boarding is via a ski instructor. Almost every ski hill has a ski or snowboarding instruction program, and you can learn the basics to advanced concepts alike under the guided supervision of a talented skier or snowboarder. Once you are comfortable, you can take a ski lift up to try some green runs out.
What is ski touring?
Ski touring is a type of backcountry skiing in areas otherwise untouched by skiers. The unmarked, unpatrolled areas off-piste that skiers frequent provide a unique set of challenges and runs that are not otherwise found on the mountain, and for that reason, should be left to experienced skiers. One aspect that separates ski touring from other types of back-country alpinesport is the use of free heeled skis, allowing cross country like skiing on flatter or uphill areas in the back country.
Ski and snowboard equipment is so expensive. How can I save money?
It is true that skiing and snowboarding are expensive hobbies to get into. While you can rent the skis, boards and boots required, if you go often you may spend way more in the long term. If you are concerned about spending too much money, we suggest waiting until the season starts to end around April or May. Typically you will be able to find out of season equipment at clearance prices, saving you lots of money before the upcoming season the next winter.
Read more

The Best Thermal Shirts in Canada
A thermal shirt is one of the bests ways to stay warm during the cold weather.
The Best Ski and Snowboard Helmets in Canada
With winter in full swing, it’s the perfect time to go skiing or snowboarding.

The Best Balaclavas and Neck Gaiters in Canada
Whether looking for a balaclava or a neck gaiter, we got the best for the ski hill.
The Best Ski Socks for Canadians
Frostbite? Not Cool. Protect your feet from the harsh mountain winter with this selection of ski socks, so you can go back to shredding snow.

allergy medications prescription list is claritin stronger than benadryl strongest over the counter allergy
do you need a prescription allergy pills for adults does allegra require a prescription
skin allergy tablets list piriton allergy tablets canada tablet for allergy on skin